ucsd-creative-robotics
Dev Board Actuators
Making things move.
- Servo Sweep
- Servo Knob
- DC Motors
- PCA9685 12bit Servo Driver - multiple servos at once.
Servo Motor
Rotational motion 0-180 degrees.
Another use of Pulse Width Modulation is driving the position of a servo motor.
Servo Sweep
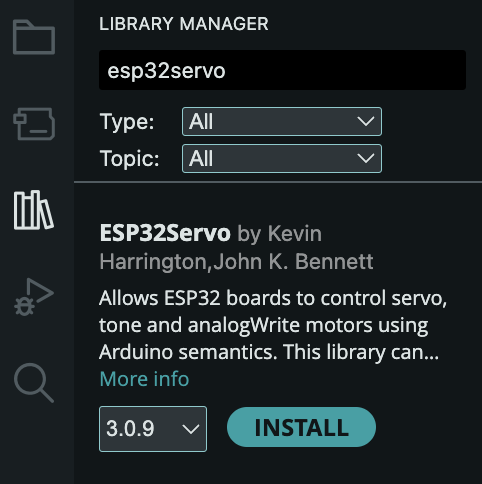
- Install the ESP32Servo library:
- Tools -> Manage Libraries:
- Search for ESP32Servo. Click Install:
- Tools -> Manage Libraries:
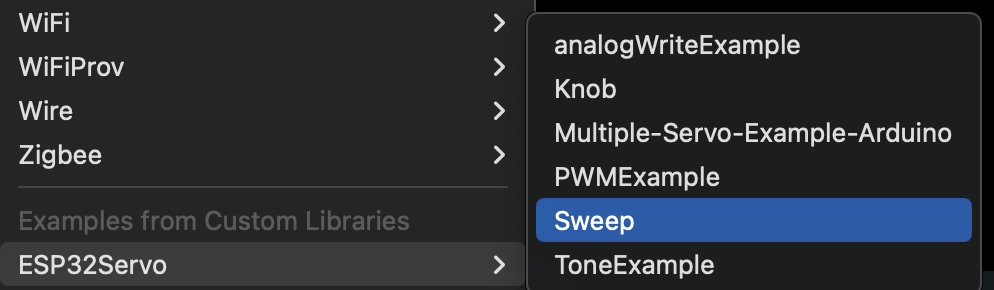
- Under Examples -> ESP32Servo, select the Sweep example:
- Make sure that your servo is connected to the pins used in the example code. Or change the pins in the code to match your setup.

- Wire up the servo:
- BLACK/BROWN -> Ground
- RED/YELLOW -> +5V
- ORANGE -> your
servoPin.
- Compile and run the example.

Servo Knob
We are going to use the potentiometer knob as an input device. You can think of a knob as a kind of simple “sensor” to drive the servo motion.
- Under Examples -> ESP32Servo, select the Knob example:

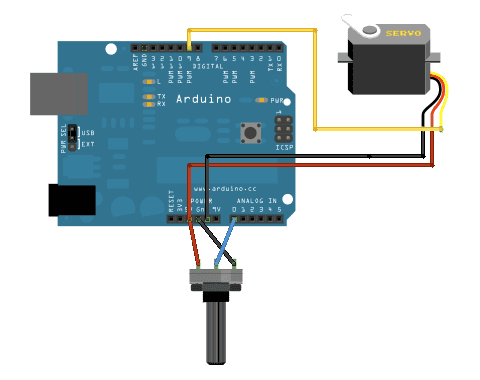
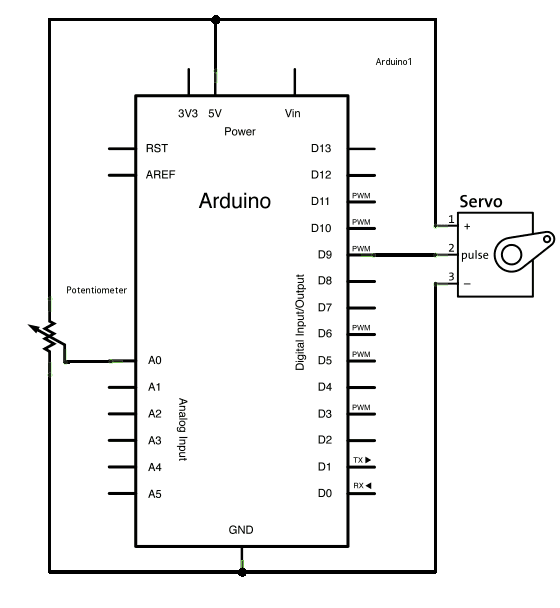
- Reading the schematic.
- Use the servo to control two knobs.
DC Motors
Drive DC motors using Colin’s motor shield.
Continous forward/backward motion and speed control with PWM outputs. Including geared DC motors, which are a special instance of the above with slower rotation rate.
Wiring
From the ESP32 to the Motor Shield, connect:
- GND -> GND
- 5V -> 5V
- 3.3V -> 3.3V
- pin 45 -> pin 45 (MTR1A)
- pin 46 -> pin 46 (MTR1B)
Connect the two wires of your DC motor to M1 screw terminal.
Connect external power to 4.5-11V in.
Code
// Using the DRV8835DSSR driver on the Envision Motor Shield
// define the pins for IN-IN mode (MTR1A and MTR1B)
// rtwomey@ucsd.edu

const int in1Pin = 45;
const int in2Pin = 46;

// PWM Settings
const int freq = 10000;
const int resolution = 8; // 0-255 range

void setup() {
  // Attach both pins to the LEDC PWM peripheral
  ledcAttach(in1Pin, freq, resolution);
  ledcAttach(in2Pin, freq, resolution);
}

void loop() {
  // Move Forward at 75% speed
  // IN1 gets PWM, IN2 stays LOW
  ledcWrite(in1Pin, 192);
  ledcWrite(in2Pin, 0);
  delay(4000);

  // Brake (Locks the motor)
  ledcWrite(in1Pin, 255);
  ledcWrite(in2Pin, 255);
  delay(2000);

  // Move Backward at 100% speed
  // IN1 stays LOW, IN2 gets PWM
  ledcWrite(in1Pin, 0);
  ledcWrite(in2Pin, 255);
  delay(4000);

  // Coast (Let the motor spin down freely)
  ledcWrite(in1Pin, 0);
  ledcWrite(in2Pin, 0);
  delay(2000);
}
DC Motors and Servo
This example controls a single DC motor (with direction and speecd) together with a single servo using Colin’s ESP32 Motor Shield.
Wiring
From the ESP32 to the Motor Shield, connect:
- GND -> GND
- 5V -> 5V
- 3.3V -> 3.3V
- pin 39 -> pin 39 (MTR4B)
- pin 40 -> pin 40 (MTR4A)
- pin 44 -> pin 44
Connect the two wires of your DC motor to M1 screw terminal.
Connect the three wires of the servo to the three pins next to pin 44. Be sensitive to the GND, 5V and SIGNAL.
Connect external power to 4.5-11V in.
Code
// Using the DRV8835DSSR driver on the Envision Motor Shield
// define the pins for IN-IN mode (MTR4A and MTR4B)
// rtwomey@ucsd.edu
#include <ESP32Servo.h>

// M4 on pins 39 and 40
const int in1Pin = 39; // MTR4B
const int in2Pin = 40; // MTR4A

Servo myServo;
const int servoPin = 44; // Servo on Pin 44

// PWM Settings
const int freq = 10000;
const int resolution = 8; // 0-255 range

void setup() {
  // Allow allocation of all timers
  ESP32PWM::allocateTimer(0);
  ESP32PWM::allocateTimer(1);
  ESP32PWM::allocateTimer(2);
  ESP32PWM::allocateTimer(3);
  myServo.setPeriodHertz(50); // Standard 50hz servo
  myServo.attach(servoPin, 500, 2400); // Attach with min/max pulse widths
}

void loop() {
  // Move Forward at 75% speed
  // IN1 gets PWM, IN2 stays LOW
  analogWrite(in1Pin, 192);
  analogWrite(in2Pin, 0);
  delay(4000);

  // Brake (Locks the motor)
  analogWrite(in1Pin, 255);
  analogWrite(in2Pin, 255);
  delay(2000);

  // Move Backward at 100% speed
  // IN1 stays LOW, IN2 gets PWM
  analogWrite(in1Pin, 0);
  analogWrite(in2Pin, 255);
  delay(4000);

  // Coast (Let the motor spin down freely)
  analogWrite(in1Pin, 0);
  analogWrite(in2Pin, 0);
  delay(2000);

  // servo movement
  myServo.write(0);   // Move to 0 degrees
  delay(1000);
  myServo.write(90);  // Move to 90 degrees
  delay(1000);
  myServo.write(180); // Move to 180 degrees
  delay(1000);
}
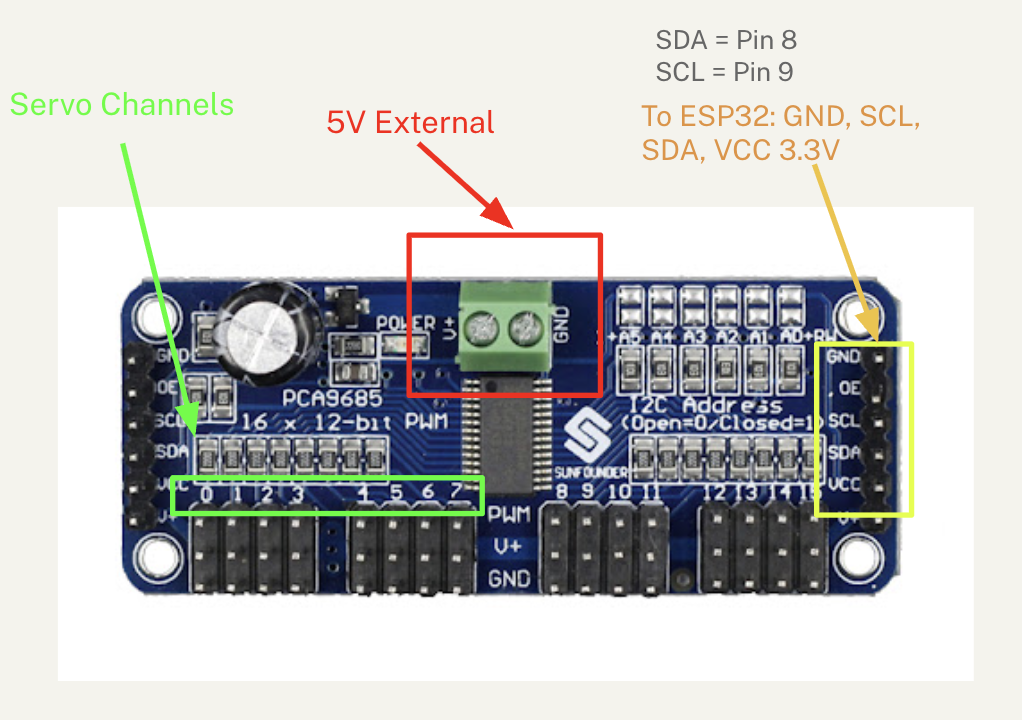
PCA9685 12bit Servo Driver
This is a 16 channnel servo driver, allowing you to control up to 16 servos with a single board. You also can power this board servos with an external power supply, so they work more reliably than they would powering through the in-built 5v supply or your USB input.
This chip, the PCA9685, is controlled over an I2C connection controlled using the Wire library.
#include <Wire.h>
#include <Adafruit_PWMServoDriver.h>


// Default address 0x40
Adafruit_PWMServoDriver pwm = Adafruit_PWMServoDriver();


// Servo pulse length specifics (calibrate as needed)
#define SERVOMIN 150  // Minimum pulse length count (out of 4096)
#define SERVOMAX 600  // Maximum pulse length count (out of 4096)


void setup() {
  Serial.begin(115200);
    // SDA=8, SCL=9 for most S3 Mini boards
  Wire.begin(8, 9);
  Serial.println("PCA9685 Servo Test");
  pwm.begin();
  pwm.setPWMFreq(60);  // Analog servos run at ~50 Hz
  delay(10);
}


void loop() {
  // Move servo 0 to 0 degrees
  setServoAngle(0, 0);
  delay(1000);

  // Move servo 0 to 180 degrees
  setServoAngle(0, 180);
  delay(1000);
}


// Helper function to map angle (0-180) to PWM pulses
void setServoAngle(uint8_t n, int angle) {
  int pulse = map(angle, 0, 180, SERVOMIN, SERVOMAX);
  pwm.setPWM(n, 0, pulse);
}
Solenoid
Push (or pull) linear potion. Digital (on/off). [TK]
Stepper Motor
Very precise rotational motion (200 steps/rotation, typically), controlled with digital outputs. [TK]
References
[TK]
ESP32-ESP32S Analog Write
Easing
