unl-digifab
Week 2 - Laser Cutter
Tuesday
- Review Rhino 2D Basics
- Topics
- Intro to Laser Cutter (hardware hands-on)
- Cutting
- Design for Laser Cutter
Artist of the Day
Review
Rhino 2D Basics
- Create new file from template. Small objects inches.
- User interface:
- Switch between single and quad (four-up) display.
- Pan, tilt, zoom in display.
- Turning Grid Snap on and off. (To create points that stick to origin, 0.25in, etc.) Try as a text command: Type Snap once to turn it on. Once to turn it off.
- 2D Primitives
- 2D Operations
- Organization
- Layers. Using layers.
- Group
- Ungroup
- Selecting. How to Select things with the mouse.
- Selection Menu
- Transforms
- Direct Manipulation
Example File 2D Basics

Rhino file: basic_drawing
Intro to Laser Cutter
Hands-on with our FSL Muse 3D (Full Spectrum Laser):
1. Laser basics
- Safety (air filtration; fire safety)
- ALWAYS before you cut: turn on the Water Cooler, Exhaust, Air Assist.
- The Muse has two lasers, actually: an infrared CO2 laser (actually cuts our materials), and a visible light Red laser (for knowing where you are going to cut)
- We also have a 3d camera. This is useful to capture an image of workspace (2D) to lay out a cut on our material. In 3D mode we can do some etching/engraving on irregular and three dimensional materials. That is an advanced topic.
2. Material choice
- Good materials for laser cutter:
- thick papers (card stock, manilla folder, index cards, office paper, watercolor paper, bristol board, vellum)
- thin cardboard (poster board, matte board, corrugated cardboard - i.e. cardboard boxes)
- plastic sheets (acrylic, ABS)
- wood (architectural plywood, balsa wood, thin birch plywood, veneers)
- engraving on leather
- textiles
- Bad materials:
- anything vinyl (PVC plastic tube and sheet, vinyl decals)
- polystyrene (i.e. styrofoam, packing peanuts)
- What other materials do you have questions about?
3. Laser Settings
- For any given material, we need to find the right power settings.
- There are three parameters we set: Speed, Power, Current.
- (see the chart at the bottom fo the page for some starting points for different materials)
- We can do formal tests to find the best parameters. See this Materials Test procedure.
- (we can also do this a little more informally)
- Blog post on Laser Settings for Cutting
- Over time, we (as a Center) will come up with our own materials settings that work well with our laser cutter.
- So, log your cuts: (date, time, material, thickness, power settings)
- (we need this to build our library of materials and settings)
4. Cut Types
- Engraving vs Cutting:
- Engraving: marking patterns into the surface of a material (faster, lower power, can engrave materials like glass, stone that can’t be cut through)
- Cutting: cutting through the material. (slow, higher power, smokes/catches fire)
- The difference is whether you are cutting through the material, or marking the surface.
- The power of our laser tube (45 Watts) determines what thickness we can cut through. Higher power lasers (65-75W, 100W) can cut through thicker materials. But there are still limits. The fiber laser (Innovation Studio) is a whole different laser type that can cut through 0.25” plate steel, for instance.
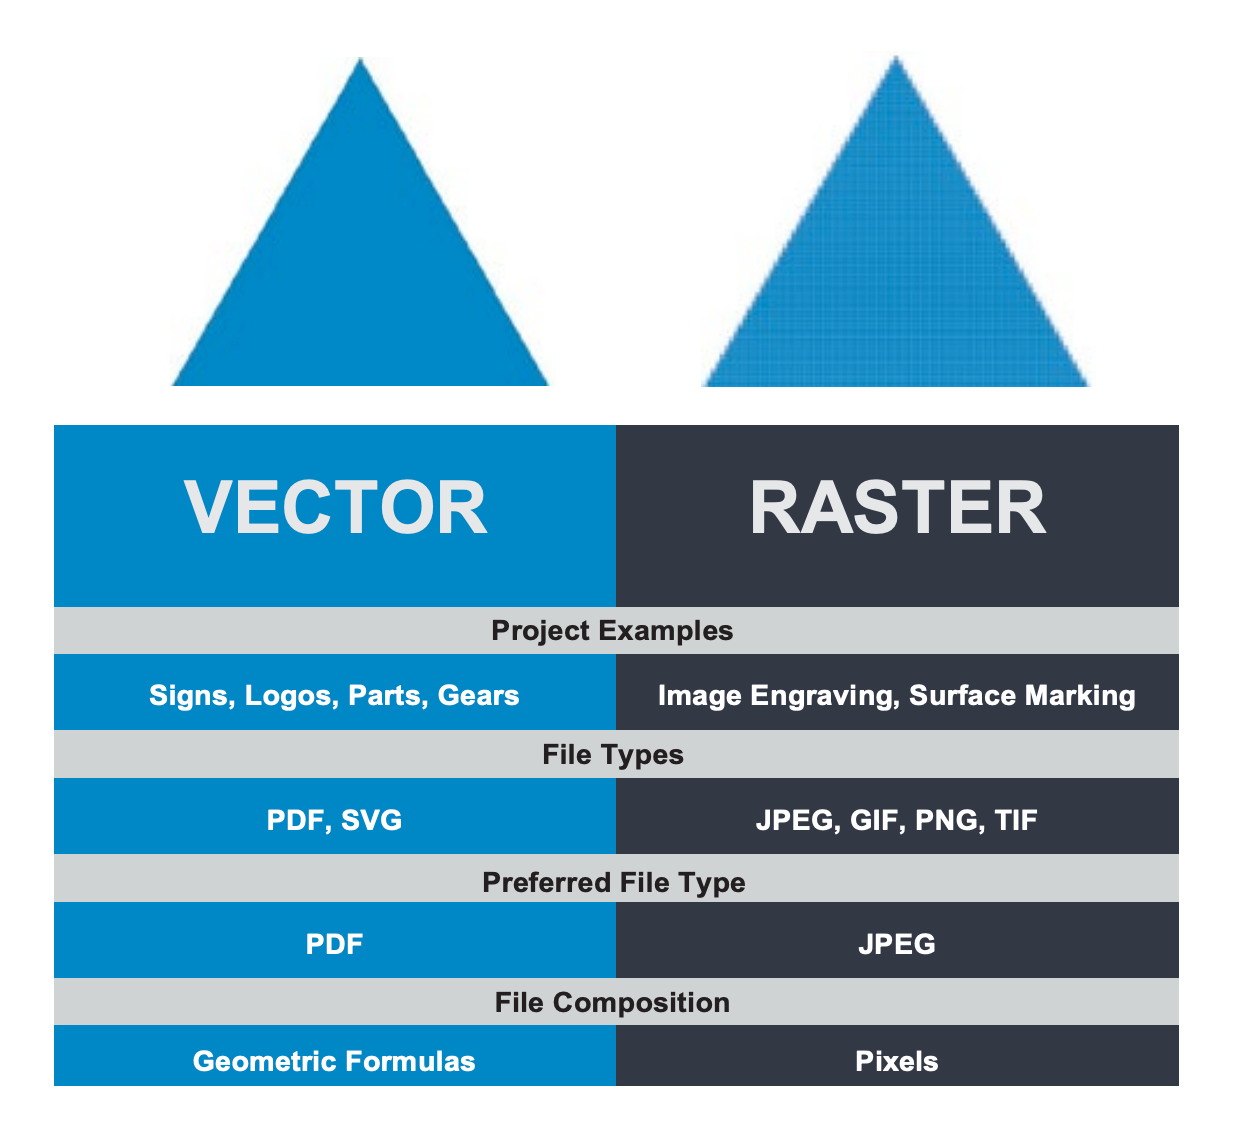
- There are three main operations we will do:
- Vector Cutting: cutting shapes out of materials. this is the bulk of what we will do. SVG files.
- Vector Engraving: using vector art to mark the surface. designs, patterns, cross-hatching. SVGs.
- Raster Engraving: rendering a bitmap on the surface of something, row by row like an old school printer. BMPs.
- In the Muse software (RetinaEngrave), “Cutting” and “Engraving” are both called Engraving. We just choose different power settings. See the chart at bottom of the page.
5. Cut demos
- We will use your HW1.
- Let’s double check/fix our HW 1 and then cut some.
Cutting
Full Spectrum Laser has their own engraving software called RetinaEngrave. We will use it from the workstation on the laser table.
- Create Design
- Open RetinaEngrave on the workstation. (Desktop Shortcut, or Safari ->
fslca88.local) - Import the design (SVG file). We will use HW1.
- Place your material in the laser cutter
- Secure your material (blue tape)
- Capture workspace (camera)
- Change your line colors/layer colors, if you need to.
- Change your scale/placement, if necessary.
- Set the engraving properties - Vector Engraving (note, it is all called “engraving” in Muse)
- Turn on Water Cooler; Exhaust; Air Assist.
- Run job.
Design for Laser Cutter
Simple Laser Cutter Design
- Create new file from template. Small objects inches.
- Drawing in 2d; using layers
- Optional: Extrude your layers to the thickness of your material, to see what this would look like as cut.
- (f.ex. for 1/8” birch plywood you would extrude it to something like 0.125” thick. you can use your calipers to check these measurements)
- Exporting to SVG.
Thursday
- Artist of the Day
- Tutorial
Artist of the Day

Ben Butler
- https://mymodernmet.com/ben-butler-organic-sculptures/
- https://www.benbutlerart.com/
Tab and Slot Construction
- How can we build 3d structure with 2d materials?
- Tab and slot construction? (also called finger joints)
- You need to design 2d parts that have holes (slots), and other parts that have tabs, so that when cut from flat materials you can assemble them into 3d forms.
- Optional: Extrude your designs to the thickness of the material, to make solides. Assemble these solides in Rhino to mock up your 3d form.
- Reference (Video Tutorials):
- Finger joint laser cut box: https://www.youtube.com/watch?v=FBSQGHBpBWg
- Finger joint tutorial in Rhino with boolean operations: https://www.youtube.com/watch?v=AYxUUSWIRW4

Measuring Thickness
- Using calipers. See Sparkfun: How To Use Calipers (youtube link)
- Cutting tests.
Matching Parts
Example Two Slots

Rhino file: two_slots.3dm
Living Hinge
- Living hinge construction
- Kerf Bending Experiments: https://www.martin-breuer.com/kerf-bending-patterns
- Lattice Hinge Design Workshop: https://futurearchi.org/t/lattice-hinge-design-workshop-starting-from-an-open-source-grasshopper-design/576
- With grasshopper: https://github.com/StDrunks/Living-Loop
Homework
- Ideas for project 1
References
- For your reference: Rhino Learn (tutorials)
- Sketchup to Rhino Cheatsheet

Laser Cutter Reference
- RetinaEngrave Software:
- FSL Muse References:
- Muse 3D Manual
- FSL Muse specifications, safety documentation.
Power Settings
- Suggested starting power settings for FSL Muse (do tests and adjust these for your project):

Leftovers
- Slicing / panelling tools (breaking 3d structure down into 2d components that can be assembled)
- Parametric design for kerfs and 3d structures (grasshopper)